
In this tutorial, you will learn how to display "hello world" message in Spring 3.0 MVC.
Spring 3 MVC Hello World Example
In this tutorial, you will learn how to display "hello world" message in Spring 3.0 MVC. The step by step method will give you a clear idea :
Step1 : First of all, create a dynamic project in eclipse of name "Spring3HelloWorld" as given below :

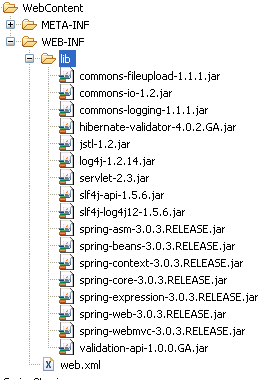
Step2 : Add the spring 3 jar files to the lib folder of WEB-INF. The added jar files are given below :
Step3 : Editing deployment descriptor(web.xml). The entry point of Spring MVC application is the Servlet define in deployment descriptor web.xml . Here, the dispatcher servlet(org.springframework.web.servlet.DispatcherServlet) is the entry point. This xml file maps the DispatcherServlet with url pattern *.html.
The first file that will appear to you i.e. index.jsp should be defined as welcome file in the web.xml. The code of the web.xml file is given below :
<?xml version="1.0" encoding="UTF-8"?>
<web-app xmlns:xsi="http://www.w3.org/2001/XMLSchema-instance"
xmlns="http://java.sun.com/xml/ns/javaee" xmlns:web="http://java.sun.com/xml/ns/javaee/web-app_2_5.xsd"
xsi:schemaLocation="http://java.sun.com/xml/ns/javaee http://java.sun.com/xml/ns/javaee/web-app_2_5.xsd"
id="WebApp_ID" version="2.5">
<display-name>Spring3HelloWorld</display-name>
<welcome-file-list>
<welcome-file>index.jsp</welcome-file>
</welcome-file-list>
<servlet>
<servlet-name>Dispatcher</servlet-name>
<servlet-class>org.springframework.web.servlet.DispatcherServlet</servlet-class>
<load-on-startup>1</load-on-startup>
</servlet>
<servlet-mapping>
<servlet-name>Dispatcher</servlet-name>
<url-pattern>*.html</url-pattern>
</servlet-mapping>
</web-app>
One thing to note here is the name of servlet in <servlet-name> tag in web.xml. Once the DispatcherServlet is initialized, it will looks for a file name [servlet-name]-servlet.xml in WEB-INF folder of web application. In this example, the framework will look for file called spring-servlet.xml. This xml file is known as configuration file.
Configuration File
Create a file Dispatcher-servlet.xml in the WEB-INF folder. Copy the following content in it :
<?xml version="1.0" encoding="UTF-8"?>
<beans xmlns="http://www.springframework.org/schema/beans"
xmlns:xsi="http://www.w3.org/2001/XMLSchema-instance" xmlns:p="http://www.springframework.org/schema/p"
xmlns:context="http://www.springframework.org/schema/context"
xsi:schemaLocation="http://www.springframework.org/schema/beans
http://www.springframework.org/schema/beans/spring-beans-3.0.xsd
http://www.springframework.org/schema/context
http://www.springframework.org/schema/context/spring-context-3.0.xsd">

<context:component-scan base-package="net.devmanuals.controller" />

<bean id="viewResolver"
class="org.springframework.web.servlet.view.UrlBasedViewResolver">
<property name="viewClass"
value="org.springframework.web.servlet.view.JstlView" />
<property name="prefix" value="/WEB-INF/jsp/" />
<property name="suffix" value=".jsp" />
</bean>
</beans>
The tag <context:component-scan> is used to load all the components from package net.devmanuals.controller and all its sub packages. This will load our HelloWorldController class.
The bean viewResolver will resolve the view and add prefix string /WEB-INF/jsp/ and suffix .jsp to the view in ModelAndView. The HelloWorldController class return a ModelAndView object with view name ?hello?. This will be resolved to path /WEB-INF/jsp/hello.jsp.
Step 4: Creation of index.jsp file which is the entry point for our application. Create index.jsp in WEB-INF folder and copy the following code in it :
<html>
<head>
<title>Spring 3 Hello World Example</title>
</head>
<body>

<a href="hello.html">Say Hello</a>
</body>
</html>
Step5 : Create the controller class. First create package "net.devmanuals.controller" and add the class HelloWorldController.java in it and copy the following code in it :
package net.devmanuals.controller;

import org.springframework.stereotype.Controller;
import org.springframework.web.bind.annotation.RequestMapping;
import org.springframework.web.servlet.ModelAndView;

@Controller
public class HelloWorldController {
@RequestMapping("/hello")
public ModelAndView helloWorld() {
String message = "Hello World, Spring 3.0!";
return new ModelAndView("hello", "message", message);
}
}
When the
Spring scans our package The annotation @Controller identify this class
as the controller bean for processing request.
The @RequestMapping annotation tells Spring that this Controller should
process all requests beginning with /hello in the URL path. That
includes /hello/* and /hello.html.
This viewResolver bean in Dispatcher-servlet.xml will resolve the view and add prefix string /WEB-INF/jsp/ and suffix .jsp to the view in ModelAndView. Note that in our HelloWorldController class, we have return a ModelAndView object with view name ?hello?. This will be resolved to path /WEB-INF/jsp/hello.jsp .
Step6 : The View in MVC. Create hello.jsp to display hello world message. This hello.jsp should be placed inside WEB-INF/jsp . Copy the content from the jsp file given below :
<html>
<head>
<title>Spring 3 MVC Hello World Example</title>
</head>
<body>
    ${message}
</body>
</html>
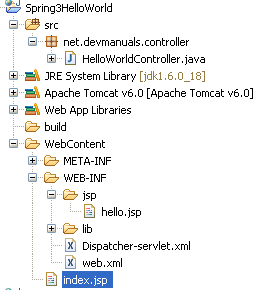
The complete structure of the application is given below :
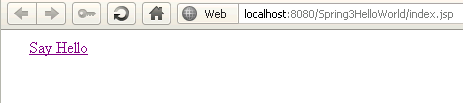
Output :
When you execute the application :
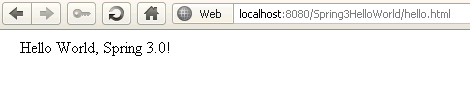
When you click on hyperlink it will redirect to you another page and will show you following message :
[ 0 ] Comments