In this tutorial you will learn about the basics of JSF Application.
JSF Simple Application
In this tutorial you will learn about the basics of JSF Application.
Don't be afraid about how the JSF applications can be developed. An JSF applications are just like the other web applications that you were developed or saw using the other Java technologies. An JSF applications may includes the following :
- JavaBeans components(called backing beans) to define the properties and functions for UI components.
- Set of JSP pages.
- Application configuration resource file that contains the information about page navigation rules, configuration of beans and other custom objects.
- A web.xml (deployment descriptor) file.
- Set of custom objects, if created by the developer, may include custom components, validators, converters or listeners.
- Custom tags to represent custom objects.
If an JSF application includes the JSP pages as presentation technology also applies the Standard tag libraries specified by JSF technology to UI components representation and for any other objects.
In developing an JSF applications there may be the different development roles. These are as follows :
- Page Author
A developer/designer of the page that creates the pages using JSF tag libraries. - Application Developer
A developer/programmer that writes the code or make the program for custom converters, validators, listeners, and the backing beans. - Component Author
A developer that construct UI components and renders. - Application Architect
They are responsible for configuring the application, custom objects as well as to define the page navigation rule, and creating web.xml.
Example :
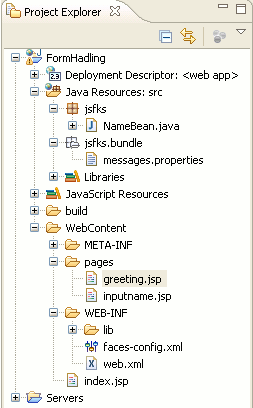
Here an example is being given below will demonstrate you about how to develop an application using JSF. This is a simple example but if you are new in JSF, this example will help you very much. Here I have used an Eclipse IDE to create a simple JSF example. Before creating the example you should have available a Java EE 6 based application server, or the server which supported at least servlet 2.5, at least JDK 1.5 or more, some jar files like "jsf-api-2.0.jar", "jsf-impl.jar" and many more (we will learn about this in step by step further studies). So if you have not available these resources then installed these first. After installing all these resources create a dynamic project in eclipse and give some name and must kept your directory structure as given in the figure below :

Lets first started from JavaBean, in this example I have created a JavaBean named PersonBean that have an attribute "name" that specifies the name of Person. The JavaBean class is as follows :
NameBean.java
package jsfks;

public class NameBean {

String name;

public String getName() {
return name;
}

public void setName(String name) {
this.name = name;
}
}
In the above Java file there is a single attribute is declared named "name" and the setter and getter method that will set the value of this attribute when in the specified text box on the form (discussed later) value will be entered by the user and the set value will be returned on request using getter method.
Next created a properties file to retrieve the value from key-value pair.
messages.properties
inputname_header=JSF Tutorial
prompt=Enter your name:
greeting_text=Welcome to Devmanuals JSF tutorial
button_text=Submit
sign=!
Above file is a Property file where the values are kept in the key-value pair. The Left-Hand-Side value from the = operator specifies the key and the Right-Hand-Side value from the = operator specifies the corresponding key's value. To fetch the value of corresponding key you will have first load this resource on the required page using the tag <f : loadBundle basename="resourceName" var="variableName"/>. Benefit to working with resource files is that you are not required to hard code anything into your JSP files.
Next created some JSP pages that will be called later that will control the page flow and/or output by program.
inputname.jsp
<%@ taglib uri="http://java.sun.com/jsf/html" prefix="h" %>
<%@ taglib uri="http://java.sun.com/jsf/core" prefix="f" %>
<f:loadBundle basename="jsfks.bundle.messages" var="msg"/>

<html>
<head>
<title>Input page</title>
</head>
<body>
<f:view>
<h1>
<h:outputText value="#{msg.inputname_header}"/>
</h1>
<h:form id="helloForm">
<h:outputText value="#{msg.prompt}"/>
<h:inputText value="#{nameBean.name}" />
<h:commandButton action="greeting" value="#{msg.button_text}" />
</h:form>
</f:view>
</body>
</html>
Above JSP page is written for taking the input in the specified textbox which value will be passed to the greeting.jsp page after clicking on submit button. In this page I have used some JSF tag libraries to design a view. And loaded the properties file to get the value of the corresponding key.
greeting.jsp
<%@ taglib uri="http://java.sun.com/jsf/html" prefix="h" %>
<%@ taglib uri="http://java.sun.com/jsf/core" prefix="f" %>
<f:loadBundle basename="jsfks.bundle.messages" var="msg"/>

<html>
<head>
<title>greeting page</title>
</head>
<body>
<f:view>
<h3>
<h:outputText value="#{msg.greeting_text}" /><br>
<h:outputText value="Hi, #{nameBean.name}" />
<h:outputText value="#{msg.sign}" />
</h3>
</f:view>
</body>
</html>
Above JSP page is created for the producing output after taking the input and submit the requested page inputname.jsp. For this page I have also used tag libraries of JSF that provides a better way to handle the views.
Then created the configuration files in WEB-INF folder. One of them is faces-config.xml, this file is required to create for specifying the registration of JSF application's resources like the managed beans, converters, validators etc. and the other is web.xml file that provides the information to the server about the application.
faces-config.xml
<?xml version="1.0" encoding="windows-1252"?>
<!DOCTYPE faces-config PUBLIC
"-//Sun Microsystems, Inc.//DTD JavaServer Faces Config 1.1//EN"
"http://java.sun.com/dtd/web-facesconfig_2_0.dtd">

<faces-config>
<navigation-rule>
<from-view-id>/pages/inputname.jsp</from-view-id>
<navigation-case>
<from-outcome>greeting</from-outcome>
<to-view-id>/pages/greeting.jsp</to-view-id>
</navigation-case>
</navigation-rule>
<managed-bean>
<managed-bean-name>nameBean</managed-bean-name>
<managed-bean-class>jsfks.NameBean</managed-bean-class>
<managed-bean-scope>request</managed-bean-scope>
</managed-bean>
</faces-config>
web.xml
<?xml version="1.0"?>
<!DOCTYPE web-app PUBLIC
"-//Sun Microsystems, Inc.//DTD Web Application 2.3//EN"
"http://java.sun.com/dtd/web-app_2_3.dtd">
<web-app>

<context-param>
<param-name>javax.faces.STATE_SAVING_METHOD</param-name>
<param-value>server</param-value>
</context-param>

<context-param>
<param-name>javax.faces.CONFIG_FILES</param-name>
<param-value>/WEB-INF/faces-config.xml</param-value>
</context-param>

<listener>
<listener-class>com.sun.faces.config.ConfigureListener</listener-class>
</listener>

<!-- Faces Servlet -->
<servlet>
<servlet-name>Faces Servlet</servlet-name>
<servlet-class>javax.faces.webapp.FacesServlet</servlet-class>
<load-on-startup> 1 </load-on-startup>
</servlet>

<!-- Faces Servlet Mapping -->
<servlet-mapping>
<servlet-name>Faces Servlet</servlet-name>
<url-pattern>*.jsf</url-pattern>
</servlet-mapping>

</web-app>
And finally created an index page which will be invoked first when you will deploy your example, When a request will be made for this page it will forwarded the request to the inputname.jsp page however extension specifies a JSF page but internally this page will be forwarded to the JSP page.
index.jsp
<html>
<body>
<jsp:forward page="/pages/inputname.jsf" />
</body>
</html>
Output :
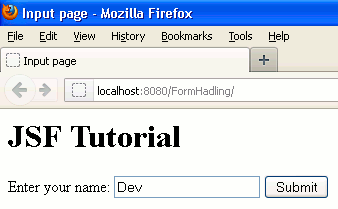
When you will deploy this example output will be as follows :

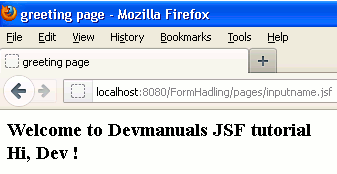
After enter the text in the specified textbox clicked on button then the output will be as follows :

Here I am giving a .war file to download this example. You can import this .war file into your eclipse simple by File -> import -> WAR File -> Next -> Browse for .war file path -> Finish.


[ 0 ] Comments