
In this tutorial you will learn about the JSF core param tag.
JSF 2 f param
In this tutorial you will learn about the JSF core param tag.
<f:param> tag of JSF core tag library passes the value to the server side. This value is added to the enclosing UIComponent and behaves according to the associated UIComponent.
Attributes of <f:param> tag
- binding : This is not a required attribute but is used for binding the backing bean property to the associated custom component.
- id : This is not a required attribute. This attribute is used to identify a UIParameter component by an identifier.
- name : This is not a required attribute but, the use of this attribute specifies the name of parameter.
- value : This is not a required attribute but, is used to set the value of parameter.
- disable : This is not a required attribute. This is used for controlling the inclusion of the parameter.
Example :
For creating example I have used the following setups.
- JDK 1.6
- Apache Tomcat 7
- JSF 2.1.1
As we read in this tutorial about the <f:param> tag which is used to set the value of the component as well as it can pass parameters to the backing bean. So lets see an example which will demonstrate you about how a <f:param> tag sets the value of component and passes the parameter to the backing bean. In this example you will see how the <f:param> tag can be used and how it behaves differently when attached with different types of component. Here at first I have created a New Dynamic Web Project in Eclipse then added the JSF capabilities into it and created a package into src folder in eclipse inside which created a Java Bean class with the property 'name' and 'country' and the setter getter method to set and fetch the value of its property, then created a folder into the Web Content folder in Eclipse to keep the JSF pages. Inside this folder created the JSF pages 'inputPage.xhtml' into which the JSF tags are used for taking input and the 'outputPage.xhtml' in this page used the JSF tags for showing the output. In the outputPage.xhtml I have used the <f:param> tag which will provide the value to the <h:outputFormat> tag in {0} and {1}. Then changed the welcome-file-list in the auto generated web.xml file as : <welcome-file>jsfPages/inputPage.xhtml</welcome-file>. And finally executed this example
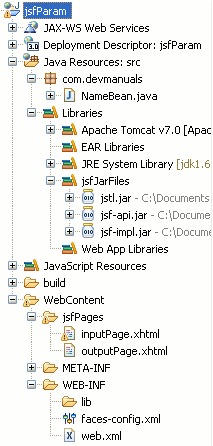
Directory Structure of this example :
NameBean.java
package com.devmanuals;

import javax.faces.bean.ManagedBean;
import javax.faces.bean.RequestScoped;

@ManagedBean(name="nameBean")
@RequestScoped
public class NameBean {
public String name;
public String country;

public String getName() {
return name;
}

public void setName(String name) {
this.name = name;
}

public String getCountry() {
return country;
}

public void setCountry(String country) {
this.country = country;
}
}
inputPage.xhtml
<!DOCTYPE html PUBLIC "-//W3C//DTD XHTML 1.0 Transitional//EN"
"http://www.w3.org/TR/xhtml1/DTD/xhtml1-transitional.dtd">

<html xmlns="http://www.w3.org/1999/xhtml"
xmlns:h="http://java.sun.com/jsf/html"
xmlns:f="http://java.sun.com/jsf/core">
<head>
<title>Input page</title>
</head>
<f:view>
<h:form>
Enter Your Name : <h:inputText value="#{nameBean.name}" /><br/><br/>
Enter Your Country : <h:inputText value="#{nameBean.country}" /><br/>
<h:commandButton value="submit" action="outputPage"/>
</h:form>
</f:view>
</html>
outputPage.xhtml
<!DOCTYPE html PUBLIC "-//W3C//DTD XHTML 1.0 Transitional//EN"
"http://www.w3.org/TR/xhtml1/DTD/xhtml1-transitional.dtd">

<html xmlns="http://www.w3.org/1999/xhtml"
xmlns:h="http://java.sun.com/jsf/html"
xmlns:f="http://java.sun.com/jsf/core">
<head>
<title>output page</title>
</head>
<h:body>
<h:outputFormat value="Your Name is : {0}, And your country name is : {1}.">
<f:param value="#{nameBean.name}" />
<f:param value="#{nameBean.country}" />
</h:outputFormat>
</h:body>
</html>
web.xml
<?xml version="1.0" encoding="UTF-8"?>
<web-app xmlns:xsi="http://www.w3.org/2001/XMLSchema-instance" xmlns="http://java.sun.com/xml/ns/javaee" xmlns:web="http://java.sun.com/xml/ns/javaee/web-app_2_5.xsd" xsi:schemaLocation="http://java.sun.com/xml/ns/javaee http://java.sun.com/xml/ns/javaee/web-app_3_0.xsd" id="WebApp_ID" version="3.0">
<display-name>jsfParam</display-name>
<welcome-file-list>
<welcome-file>jsfPages/inputPage.xhtml</welcome-file>
</welcome-file-list>
<servlet>
<servlet-name>Faces Servlet</servlet-name>
<servlet-class>javax.faces.webapp.FacesServlet</servlet-class>
<load-on-startup>1</load-on-startup>
</servlet>
<servlet-mapping>
<servlet-name>Faces Servlet</servlet-name>
<url-pattern>/faces/*</url-pattern>
<url-pattern>*.jsf</url-pattern>
<url-pattern>*.xhtml</url-pattern>
</servlet-mapping>
<context-param>
<description>State saving method: 'client' or 'server' (=default). See JSF Specification 2.5.2</description>
<param-name>javax.faces.STATE_SAVING_METHOD</param-name>
<param-value>client</param-value>
</context-param>
<context-param>
<param-name>javax.servlet.jsp.jstl.fmt.localizationContext</param-name>
<param-value>resources.application</param-value>
</context-param>
<listener>
<listener-class>com.sun.faces.config.ConfigureListener</listener-class>
</listener>
<servlet-mapping>
<servlet-name>Faces Servlet</servlet-name>
<url-pattern>*.faces</url-pattern>
</servlet-mapping>
</web-app>
How to Run
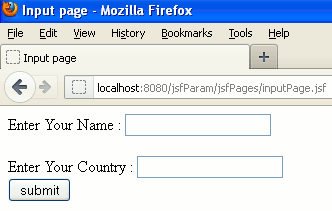
Start your server and use the following link to the address bar of your web browser : http://localhost:8080/jsfParam/jsfPages/inputPage.jsf
Output :
When you will execute the above example you will get the output as follows :
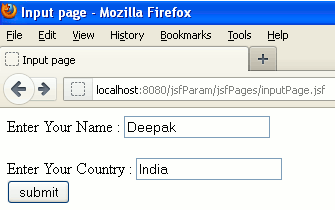
When you will give the input in the respective textboxes for example in first textbox "Deepak" and in second textbox "India" output will be as follows :
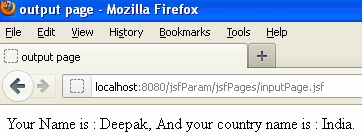
And in last when you will input the values in textboxes and clicked on the button named "submit" output will be as follows :
[ 0 ] Comments