In this tutorial your will learn about how to load resource bundle globally in JSF.
JSF 2 Load Resource Bundle
In this tutorial your will learn about how to load resource bundle globally in JSF.
Resource bundle is a Java .properties file where the values are kept in the form of key-value pair. It is generally used in the internationalization where the Locale-specific data is isolated from the direct Java code i.e to avoid the hard coding of the translated values within the Java code directly kept them into a discrete .properties file. Benefit to follow this approach is to reduce the application's maintenance problem, because the change in source code is not required due to a new properties file containing the translated values is created by the localizer because, the program refers only keys not the values. In JSF 2 resource bundle can be loaded in two ways :- In the first approach we can use the JSF core tag library <f:loadBundle> by specifying the valur of its attribute 'var'. (How ? Click Here). In the second approach we can declare the properties file explicitly by creating the faces-config.xml file in the WEB-INF folder in Eclipse. In this tutorial we will focus on the globally declaration of the properties file.
How to declare properties file within the faces-config.xml
<application>
<resource-bundle>
<base-name>devmanuals.prop</base-name>
<var>pr</var>
</resource-bundle>
</application>
Example :
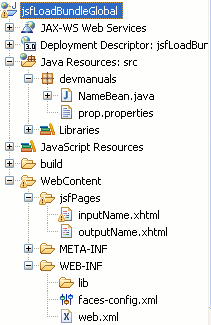
Here an example is being given will demonstrate you about how to declare the properties file globally (explicitly). To do so at first I have created a New Dynamic Web Project then added the JSF capabilities into it. Now created a package named 'devmanuals' in the src folder in Eclipse and inside this package created a properties file and the Java Bean class (source code is given below). Then created a folder in the Web Content folder in Eclipse that contains the inputName.xhtml and outputName.xhtml JSF files, the inputName.xhtml page contains the <h:inputText> tag to take the input on web page, <h:outputText> to show the any content on web page, <h:commandButton> to submit the form. And in the outputName.xhtml page simply the <h:panelGrid> and <h:outputText> tags are used. Then declared the bundle in the faces-config.xml file which is auto created by the Eclipse and finally changed the welcome-file-list in the auto generated web.xml file as follows <welcome-file>jsfPages/inputName.xhtml</welcome-file>.
Directory Structure of this project

prop.properties
text1=Enter your Name :
text2=Your Name is : {0}
button=SUBMIT
NameBean.java
package devmanuals;
import javax.faces.bean.ManagedBean;
import javax.faces.bean.RequestScoped;

@ManagedBean(name="nameBean")
@RequestScoped
public class NameBean {

String name;

public String getName() {
return name;
}

public void setName(String name) {
this.name = name;
}
}
inputName.xhtml
<!DOCTYPE html PUBLIC "-//W3C//DTD XHTML 1.0 Transitional//EN"
"http://www.w3.org/TR/xhtml1/DTD/xhtml1-transitional.dtd">

<html xmlns="http://www.w3.org/1999/xhtml"
xmlns:h="http://java.sun.com/jsf/html"
xmlns:f="http://java.sun.com/jsf/core">
<f:view>
<h:form>
<h:outputText value="#{pr.text1}"/><h:inputText value="#{nameBean.name}" />
<h:commandButton value="#{pr.button}" action="outputName.xhtml"/>
</h:form>
</f:view>
</html>
outputName.xhtml
<!DOCTYPE html PUBLIC "-//W3C//DTD XHTML 1.0 Transitional//EN"
"http://www.w3.org/TR/xhtml1/DTD/xhtml1-transitional.dtd">

<html xmlns="http://www.w3.org/1999/xhtml"
xmlns:h="http://java.sun.com/jsf/html"
xmlns:f="http://java.sun.com/jsf/core">
<f:view>
<h:panelGrid>
<h:outputFormat value="#{pr.text2}">
<f:param value="#{nameBean.name}" />
</h:outputFormat>
</h:panelGrid>
</f:view>
</html>
faces-config.xml
<?xml version="1.0" encoding="UTF-8"?>
<faces-config
xmlns="http://java.sun.com/xml/ns/javaee"
xmlns:xsi="http://www.w3.org/2001/XMLSchema-instance"
xsi:schemaLocation="http://java.sun.com/xml/ns/javaee http://java.sun.com/xml/ns/javaee/web-facesconfig_2_0.xsd"
version="2.0">

<application>
<resource-bundle>
<base-name>devmanuals.prop</base-name>
<var>pr</var>
</resource-bundle>
</application>

</faces-config>
web.xml
<?xml version="1.0" encoding="UTF-8"?>
<web-app xmlns:xsi="http://www.w3.org/2001/XMLSchema-instance" xmlns="http://java.sun.com/xml/ns/javaee" xmlns:web="http://java.sun.com/xml/ns/javaee/web-app_2_5.xsd" xsi:schemaLocation="http://java.sun.com/xml/ns/javaee http://java.sun.com/xml/ns/javaee/web-app_3_0.xsd" id="WebApp_ID" version="3.0">
<display-name>jsfLoadBundle</display-name>
<welcome-file-list>
<welcome-file>jsfPages/inputName.xhtml</welcome-file>
</welcome-file-list>
<servlet>
<servlet-name>Faces Servlet</servlet-name>
<servlet-class>javax.faces.webapp.FacesServlet</servlet-class>
<load-on-startup>1</load-on-startup>
</servlet>
<servlet-mapping>
<servlet-name>Faces Servlet</servlet-name>
<url-pattern>/faces/*</url-pattern>
<url-pattern>*.jsf</url-pattern>
<url-pattern>*.xhtml</url-pattern>
</servlet-mapping>
<context-param>
<description>State saving method: 'client' or 'server' (=default). See JSF Specification 2.5.2</description>
<param-name>javax.faces.STATE_SAVING_METHOD</param-name>
<param-value>client</param-value>
</context-param>
<context-param>
<param-name>javax.servlet.jsp.jstl.fmt.localizationContext</param-name>
<param-value>resources.application</param-value>
</context-param>
<listener>
<listener-class>com.sun.faces.config.ConfigureListener</listener-class>
</listener>
<servlet-mapping>
<servlet-name>Faces Servlet</servlet-name>
<url-pattern>*.faces</url-pattern>
</servlet-mapping>
</web-app>
How to Run this example
Start/Run the server and use the http://localhost:8080/jsfLoadBundleGlobal/jsfPages/inputName.jsf link on your web browser
Output :
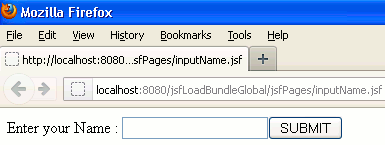
When you will execute this example you will get the output as follows :

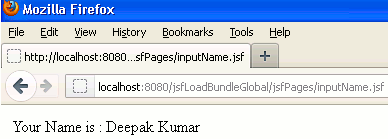
But when you will enter some value into the given text and clicked on the button named "SUBMIT" then the output will be as follows :


[ 0 ] Comments